Setting up Kubernetes with Cilium and Cloudflare

Working with  Docker Containers can be hard. However, there are tools which enhance the management of containers, like
  Kubernetes. Actually, Kubernetes is the only tool to my knowledge which acts as a management software for Docker Containers. Kubernetes is well-integrated in almost all cloud providers, like Google Cloud, Azure and AWS. As a result, it has a standardized
 yaml-syntax, which is great for small developers because they can switch between The Big Three with low effort.
Install everything and then apply cert-manager. ez
curl -sfL https://get.k3s.io | sh -s - \  --flannel-backend=none \  --disable-kube-proxy \  --disable servicelb \  --disable-network-policy \  --disable traefik \  --cluster-init
curl https://raw.githubusercontent.com/helm/helm/main/scripts/get-helm-3 | bash
helm repo add cilium https://helm.cilium.io/helm repo updatehelm install cilium cilium/cilium
CILIUM_CLI_VERSION=$(curl -s https://raw.githubusercontent.com/cilium/cilium-cli/main/stable.txt)CLI_ARCH=amd64curl -L --fail --remote-name-all https://github.com/cilium/cilium-cli/releases/download/${CILIUM_CLI_VERSION}/cilium-linux-${CLI_ARCH}.tar.gzsudo tar xzvfC cilium-linux-${CLI_ARCH}.tar.gz /usr/local/binrm cilium-linux-${CLI_ARCH}.tar.gz
cilium install \  --set k8sServiceHost=${API_SERVER_IP} \  --set k8sServicePort=6443 \  --set kubeProxyReplacement=true
cilium status --wait
helm install cert-manager jetstack/cert-manager --namespace cert-manager --create-namespace --set crds.enabled=true# secret-cloudflare.yamlapiVersion: v1kind: Secretmetadata: name: cloudflare-api-key-secret namespace: cert-managertype: OpaquestringData: api-key: <Cloudflare API Token (not encrypted)>---# cert-issuer.yamlapiVersion: cert-manager.io/v1kind: ClusterIssuermetadata: name: acme-issuer namespace: cert-managerspec: acme: email: <Email for updates> server: https://acme-v02.api.letsencrypt.org/directory privateKeySecretRef: name: acme-issuer solvers: - dns01: cloudflare: email: <Cloudflare account Email> apiTokenSecretRef: name: cloudflare-api-token-secret key: api-tokenAs Hagen explains in his article, we want to install k3s with no configurations and everything disabled. He describes what components are not installed in details.
curl -sfL https://get.k3s.io | sh -s - \ --flannel-backend=none \ --disable-kube-proxy \ --disable servicelb \ --disable-network-policy \ --disable traefik \ --cluster-initAfter the installation, there should be some pods running (3). Don’t be shocked if the pods are in the ContainerCreating or Pending state. This is because the pods can’t communicate between each other because we disabled the CNI (--flannel-backend=none). We will later install  Cilium, which will be the replacement of the Flannel CNI.
kubectl get pods -AHelm is the package manager for Kubernetes, so you should either install it directly (follow the Helm docs) or use parts of Helm which are shipped with Cilium. We chose to install Helm directly, which is easily possible with this command:
curl https://raw.githubusercontent.com/helm/helm/main/scripts/get-helm-3 | bashCilium is a networking and security software for Kubernetes. Cilium is very fast, scalable and secure because it’s built upon eBPF — a revolutionary technology that can run sandboxed programs in the Linux kernel without recompiling the kernel or loading kernel modules.
We could install Cilium with Helm like shown here:
helm repo add cilium https://helm.cilium.io/helm repo updatehelm install cilium cilium/ciliumHowever, we wanted to install with their CLI and this is how you can do it. Firstly, install the Cilium CLI by running this code snipped:
CILIUM_CLI_VERSION=$(curl -s https://raw.githubusercontent.com/cilium/cilium-cli/main/stable.txt)CLI_ARCH=amd64curl -L --fail --remote-name-all https://github.com/cilium/cilium-cli/releases/download/${CILIUM_CLI_VERSION}/cilium-linux-${CLI_ARCH}.tar.gzsudo tar xzvfC cilium-linux-${CLI_ARCH}.tar.gz /usr/local/binrm cilium-linux-${CLI_ARCH}.tar.gzThen you can install Cilium with your Server IP-Address:
cilium install \ --set k8sServiceHost=${API_SERVER_IP} \ --set k8sServicePort=6443 \ --set kubeProxyReplacement=trueNow we wait until Cilium says, everything is OK or disabled:
cilium status --waitAfter a while, all pods should be Running.
kubectl get pods -ALast but not least, you can apply some resources for Cilium:
apiVersion: cilium.io/v2alpha1kind: CiliumL2AnnouncementPolicymetadata: name: default-l2-announcement-policy namespace: kube-systemspec: externalIPs: true loadBalancerIPs: trueapiVersion: "cilium.io/v2alpha1"kind: CiliumLoadBalancerIPPoolmetadata: name: "first-pool"spec: blocks: - start: "192.168.0.240" stop: "192.168.0.249"Additionally you should upgrade the cilium config. In order to do that with the proper values, first create this file in the root directory where you wanna manage the k3s cluster. Later you could also apply some hubble and prometheus related properties if you want to use  Grafana or so (open the collapsed lines if you want to use our config as well).
k8sServiceHost: 127.0.0.1k8sServicePort: 6443
kubeProxyReplacement: truel2announcements: enabled: true
externalIPs: enabled: true
k8sClientRateLimit: qps: 50 burst: 200
operator: replicas: 1 rollOutPods: true prometheus: enabled: true
rollOutCiliumPods: true
ingressController: enabled: true default: true loadbalancerMode: shared service: annotations: io.cilium/lb-ipam-ips: 192.168.0.240
28 collapsed lines
hubble: relay: enabled: true ui: enabled: true metrics: serviceMonitor: enabled: true enableOpenMetrics: true enabled: - dns - drop - tcp - icmp - port-distribution - "flow:sourceContext=workload-name|reserved-identity;destinationContext=workload-name|reserved-identity" - "kafka:labelsContext=source_namespace,source_workload,destination_namespace,destination_workload,traffic_direction;sourceContext=workload-name|reserved-identity;destinationContext=workload-name|reserved-identity" - "httpV2:exemplars=true;labelsContext=source_ip,source_namespace,source_workload,destination_ip,destination_namespace,destination_workload,traffic_direction;sourceContext=workload-name|reserved-identity;destinationContext=workload-name|reserved-identity" dashboards: enabled: true namespace: monitoring annotations: grafana_folder: "Hubble"
prometheus: enabled: true serviceMonitor: enabled: trueRun this command to upgrade:
cilium upgrade -f cilium-config.yamlIn order to be able to create certificates for each subdomain, it is important to apply a certificate issuer which handles certificate requests and resolves them at some provider. We chose  Cloudflare as our issuer and here is the setup which you need to apply to your Kubernetes cluster. For further information you can check out the cert-manager docs.
But first, we need to install the cert-manager by running the following command:
helm install cert-manager jetstack/cert-manager --namespace cert-manager --create-namespace --set crds.enabled=trueapiVersion: cert-manager.io/v1kind: ClusterIssuermetadata: name: acme-issuer namespace: cert-managerspec: acme: email: <Email for updates> server: https://acme-v02.api.letsencrypt.org/directory privateKeySecretRef: name: acme-issuer solvers: - dns01: cloudflare: email: <Cloudflare account Email> apiTokenSecretRef: name: cloudflare-api-token-secret key: api-tokenYou can apply a file to the Kubernetes cluster, by running this k8s (also k3s) command:
kubectl apply -f cluster-issuer.yamlIf you want to delete the resource in the Kubernetes cluster, the command is pretty straight forward:
kubectl delete -f cluster-issuer.yamlAs you may have spotted above, we also need a secret for the API token which authenticates that this issuer is allowed to request certificates. Therefore, we create a secret with an unencrypted API Token from Cloudflare.
Nowadays we create a token by going to your Cloudflare dashboard, then click on your profile and select the tab API Tokens. Here you can generate a specific token for your issuer or use the Global API Key (not recommended any more). The recommended solution is to create a API token with two permissions (custom token):
- Zone - DNS - Edit
- Zone - Zone - Read
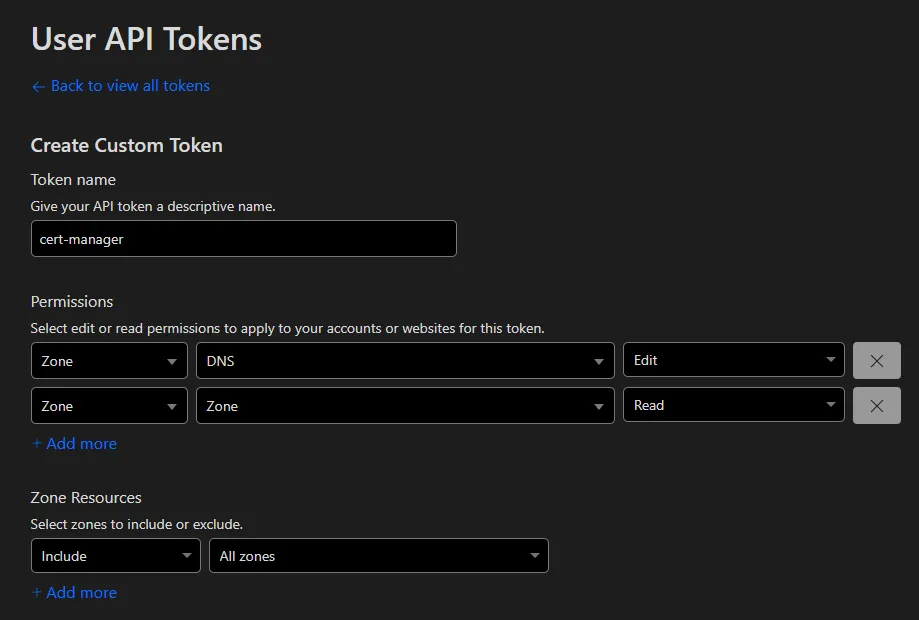
A more detailed description about the tokens, can be found in the Cloudflare docs.
After applying this secret to Kubernetes, the issuer should be ready to resolve some bad boys!
apiVersion: v1kind: Secretmetadata: name: cloudflare-api-key-secret namespace: cert-managertype: OpaquestringData: api-key: <Cloudflare API Token (not encrypted)>You can now use this issuer by applying this file which will hopefully create a certificate:
apiVersion: cert-manager.io/v1kind: Certificatemetadata: name: mutanuq namespace: mutanuqspec: secretName: mutanuq issuerRef: name: acme-issuer kind: ClusterIssuer dnsNames: - "mutanuq.trueberryless.org"It usually takes around 90 seconds to authenticate the request once applied. You can check the current status of the request by running this kubernetes command. If it takes longer than 2 minutes, maybe some tips in #Troubleshooting can help you.
kubectl describe certificaterequests.cert-manager.io -n mutanuqExample app mutanuq
Then you can use this certificate in your Ingress controller:
41 collapsed lines
apiVersion: apps/v1kind: Deploymentmetadata: name: mutanuq namespace: mutanuq labels: app: mutanuq annotations: keel.sh/policy: all keel.sh/trigger: poll keel.sh/pollSchedule: "@every 10s" keel.sh/releaseNotes: "https://github.com/trueberryless-org/mutanuq/releases"spec: replicas: 3 selector: matchLabels: app: mutanuq template: metadata: labels: app: mutanuq spec: containers: - name: mutanuq image: trueberryless/mutanuq imagePullPolicy: Always---apiVersion: v1kind: Servicemetadata: name: mutanuq namespace: mutanuq annotations: cert-manager.io/issuer: acme-issuerspec: selector: app: mutanuq ports: - name: http port: 80---apiVersion: networking.k8s.io/v1kind: Ingressmetadata: name: mutanuq namespace: mutanuqspec: rules: - host: mutanuq.trueberryless.org http: paths: - path: / pathType: Prefix backend: service: name: mutanuq port: number: 80
tls: - hosts: - mutanuq.trueberryless.org secretName: mutanuqWe always wanted a clean Continuous Integration (CI) and Continuous Delivery (CD) solution for our websites. This means, that a specific commit message should trigger an automated process over 
Keel is a robust software tool which enables this feature for Kubernetes. We used Keel for pulling new Docker Images from Docker Hub by polling every few minutes. Moreover, Keel provides a beautiful dashboard where you can control the polling as well.
In order to set up Keel with the admin dashboard, we created those files:
secret-dashboard.yamlfor the Admin Username and Password (not everyone should be able to access the dashboard)keel.yamlfor the actual k3s configs (copied and adapted from KeelHQ)
apiVersion: v1kind: Secretmetadata: name: keel-dashboard-secrets namespace: keeltype: OpaquestringData: username: <username> password: <password>154 collapsed lines
---apiVersion: v1kind: Namespacemetadata: name: keel
---apiVersion: v1kind: ServiceAccountmetadata: name: keel namespace: keel labels: app: keel
---apiVersion: rbac.authorization.k8s.io/v1kind: ClusterRolemetadata: name: keelrules: - apiGroups: - "" resources: - namespaces verbs: - watch - list - apiGroups: - "" resources: - secrets verbs: - get - watch - list - apiGroups: - "" - extensions - apps - batch resources: - pods - replicasets - replicationcontrollers - statefulsets - deployments - daemonsets - jobs - cronjobs verbs: - get - delete # required to delete pods during force upgrade of the same tag - watch - list - update - apiGroups: - "" resources: - configmaps - pods/portforward verbs: - get - create - update
---apiVersion: rbac.authorization.k8s.io/v1kind: ClusterRoleBindingmetadata: name: keelroleRef: apiGroup: rbac.authorization.k8s.io kind: ClusterRole name: keelsubjects: - kind: ServiceAccount name: keel namespace: keel
---apiVersion: networking.k8s.io/v1kind: Ingressmetadata: name: keel namespace: keelspec: rules: - host: keel.trueberryless.org http: paths: - path: / pathType: Prefix backend: service: name: keel port: number: 9300
tls: - hosts: - keel.trueberryless.org secretName: keel
---apiVersion: v1kind: Servicemetadata: name: keel namespace: keel labels: app: keelspec: type: LoadBalancer ports: - port: 9300 targetPort: 9300 protocol: TCP name: keel selector: app: keel sessionAffinity: None
---apiVersion: apps/v1kind: Deploymentmetadata: name: keel namespace: keel labels: app: keelspec: replicas: 1 selector: matchLabels: app: keel template: metadata: labels: app: keel spec: serviceAccountName: keel containers: - name: keel # Note that we use appVersion to get images tag. image: "keelhq/keel:latest" imagePullPolicy: Always command: ["/bin/keel"] env: - name: NAMESPACE valueFrom: fieldRef: fieldPath: metadata.namespace # Basic auth (to enable UI/API) - name: BASIC_AUTH_USER valueFrom: secretKeyRef: name: keel-dashboard-secrets key: username - name: BASIC_AUTH_PASSWORD valueFrom: secretKeyRef: name: keel-dashboard-secrets key: password29 collapsed lines
ports: - containerPort: 9300 livenessProbe: httpGet: path: /healthz port: 9300 initialDelaySeconds: 30 timeoutSeconds: 10 resources: limits: cpu: 100m memory: 128Mi requests: cpu: 50m memory: 64Mi
---# Source: keel/templates/pod-disruption-budget.yaml
apiVersion: policy/v1kind: PodDisruptionBudgetmetadata: name: keel namespace: keelspec: maxUnavailable: 1 selector: matchLabels: app: keelAfter applying both files and managing the additional certificate for keel.trueberryless.org, the Keel dashboard works perfectly. Moreover, every Kubernetes Deployment can opt in for automated Docker Hub Polling by setting some annotations:
apiVersion: apps/v1kind: Deploymentmetadata: name: mutanuq namespace: mutanuq labels: app: mutanuq annotations: keel.sh/policy: all keel.sh/trigger: poll keel.sh/pollSchedule: "@every 1m" keel.sh/releaseNotes: "https://github.com/trueberryless-org/mutanuq/releases"spec: replicas: 149 collapsed lines
selector: matchLabels: app: mutanuq template: metadata: labels: app: mutanuq spec: containers: - name: mutanuq image: trueberryless/mutanuq imagePullPolicy: Always---apiVersion: v1kind: Servicemetadata: name: mutanuq namespace: mutanuq annotations: cert-manager.io/issuer: acme-issuerspec: selector: app: mutanuq ports: - name: http port: 80---apiVersion: networking.k8s.io/v1kind: Ingressmetadata: name: mutanuq namespace: mutanuqspec: rules: - host: mutanuq.trueberryless.org http: paths: - path: / pathType: Prefix backend: service: name: mutanuq port: number: 80
tls: - hosts: - mutanuq.trueberryless.org secretName: mutanuqCongratulations, you’ve successfully set up Kubernetes with Cilium and Cloudflare! You deserve a coffee break. Enjoy a well-earned cup, and if you’d like to share a virtual coffee with me, feel free to support my work on Ko-fi. Thank you!
Make sure that the ip-pool includes the address specified by the annotations in the config.yaml file.
apiVersion: "cilium.io/v2alpha1"kind: CiliumLoadBalancerIPPoolmetadata: name: "first-pool"spec: blocks: - start: "192.168.0.240" # 240 included for ingress stop: "192.168.0.249"ingressController: enabled: true default: true loadbalancerMode: shared service: annotations: io.cilium/lb-ipam-ips: 192.168.0.240 # this must be within rangeIf you don’t deploy locally but on one of The Big Three, please check out some other documentation on why the External IP is still pending. It’s mostly their obligation to provide you with an address.
There can be some problem when the certificate won’t get approved by Cloudflare.
First make sure that the Cloudflare API token is correct. To make 100 percent sure, create a new one and put it (not base64 encoded) into this file:
apiVersion: v1kind: Secretmetadata: name: cloudflare-api-key-secret namespace: cert-managertype: OpaquestringData: api-key: <Cloudflare API Token (not encrypted)>We once ran into the error Error: 9109: Max auth failures reached, please check your Authorization header.. Just wait a few hours, delete the resource and apply it again:
kubectl delete -f certificate.yamlkubectl apply -f certificate.yamlHopefully, you’re now good to go!