Vibe-coding a VS Code Extension for Terraform projects

Today, I want to talk about a small VS Code extension that I vibe-coded in a single day to make working with Terraform easier. I will first explain what Terraform is, and then jump right into the functionality and reasons behind this extension. Feel free to skip the first section if you are already familiar with Terraform.
Terraform is an infrastructure-as-code (IaC) tool that lets you define your entire cloud or on-prem infrastructure as code. Its configuration language, invented by  HashiCorp, is called HCL (HashiCorp Configuration Language) and features an intuitive, human-readable syntax. The native syntax has the advantage that the learning curve is low, it is consistent for all providers and pleasant to read and write for humans, whilst the JSON-based variant is easier for machines to generate and parse.
What makes Terraform very powerful are two basic features: variables and modules. Variables enable you to create resources where the actual values can be inserted from somewhere else and modules group any number of resources, which has the advantage of reusability and nesting. While both features sound very basic, the combination of the two makes a dream team. Because the openness of Terraform enables you to define input variables for each module and also export variables via outputs.
A simple module is therefore structured like this:
Directoryazure-resource-group/
- main.tf
- variables.tf
- outputs.tf
- README.md
All files except main.tf are optional (the README.md isn’t Terraform-specific), but I prefer following best practices, so the example includes them.
Let’s look at a simple example. Imagine we want to manage a resource group in Azure with Terraform. In the variables.tf file we define what inputs we expect inside the module. Each of the two blocks represents the variable and properties of the variable, like the description or the type:
variable "name" { description = "Name of the resource group" type = string}
variable "location" { description = "Azure region" type = string default = "westeurope"}You might have noticed that the location variable also has a default property, which makes the variable optional and provides a fallback value if none is specified. These variables can then be used inside the main.tf file. In here, we define the actual resources we want to generate:
provider "azurerm" { features {}}
resource "azurerm_resource_group" "this" { name = var.name location = var.location}In this case, we just define our simple resource group, which you can think of as a folder in Azure - very amateurish explanation. Now the last part which we can implement, is the outputs.tf file:
output "resource_group_id" { description = "The ID of the resource group" value = azurerm_resource_group.this.id}This is very useful if we want to use information like the ID of the resource group later in other parts of our Terraform project.
As I already wrote, the README.md is not actually part of the Terraform definitions, but helps us understand the purpose of the module:
# Azure Resource Group Module
A minimal Terraform module that creates an Azure Resource Group.
## Usage
```hclmodule "rg" { source = "./azure-resource-group" name = "my-resource-group"}```As the README.md already suggests, we can now use this module to create an Azure Resource Group anywhere inside our project. We just need to make sure that the path to the module folder is correct and Terraform knows how to interpret the main.tf, variables.tf and outputs.tf files. In this case, since we do not specify the location variable, it will be set to "westeurope".
module "rg" { source = "./azure-resource-group" name = "my-resource-group"}I hope this section gave you a better basic understanding of what Terraform is and what you can do with it.
You might have noticed that the source field of a module creates an awesome flexibility for the whole project since you can define modules anywhere and use them anywhere inside the project.
However, this feature also has a huge drawback when it comes to maintainability: Resolving the actual values behind variables can be very tedious. While in this simple example it might seem easy to manage, the bigger the project grows, the more nested it is, the harder and more time-consuming understanding and adapting Terraform code can be. Therefore, I made an extension.
What should the extension do? The main goal of the extension is to provide the actual values of the variables everywhere you use them. If a module gets called from multiple places or just multiple times, the information should provide which use case sets the variable to which value. If modules get nested deeply, the values should resolve until we reach the .tfvars files. These are the files where you can define the hard-coded values for variables.
Creating the basic template project for a VS Code extension is as easy as running this command when you have  Node installed:
npx --package yo --package generator-code -- yo codeThis command temporarily installs the Yeoman (a generator software), and enters an interactive mode where some questions have to be answered, like the project name, type and description. In the following block you can see all questions and default answers:
# ? What type of extension do you want to create? New Extension (TypeScript)# ? What's the name of your extension? HelloWorld### Press <Enter> to choose default for all options below ###
# ? What's the identifier of your extension? helloworld# ? What's the description of your extension? LEAVE BLANK# ? Initialize a git repository? Y# ? Which bundler to use? unbundled# ? Which package manager to use? npm
# ? Do you want to open the new folder with Visual Studio Code? Open with `code`
For further information regarding VS Code extensions I want to link to the official documentation, as it is always up-to-date in contrast to my explanations here.
I like to start new projects by asking  ChatGPT for general technical questions like:
- How would you suggest achieving such a project?
- How long do you estimate it will take me?
- How difficult will it be?
Brainstorming with AI bots seems like a very sensible way to get a better overview of new projects, especially when diving into completely new waters.
Creating a VS Code extension was exactly such a use case because I had never created anything for VS Code or any other IDE before.
After this initial brainstorming phase, I prefer to use  Claude for programming all the files necessary for such an extension since in my experience this AI bot really has the ability to nail code. I hardly encountered bugs or runtime issues with Claude code, so I use it exactly for such use cases – initial starters. The drawback of Claude is its very limited free trial, which is why I am always careful when choosing my words and try to think of as many possible mistakes the AI could make ahead of time.
So this is how it began: I took some time to formulate my exact scenario and wish into the limited context windows of a random words machine called Claude and immediately received a huge
Claude for programming all the files necessary for such an extension since in my experience this AI bot really has the ability to nail code. I hardly encountered bugs or runtime issues with Claude code, so I use it exactly for such use cases – initial starters. The drawback of Claude is its very limited free trial, which is why I am always careful when choosing my words and try to think of as many possible mistakes the AI could make ahead of time.
So this is how it began: I took some time to formulate my exact scenario and wish into the limited context windows of a random words machine called Claude and immediately received a huge extension.ts implementation. Of course there were obvious differences between my vision and the communication to this LLM, so I had to tell it another time what the important considerations are and in order to be able to receive more code, I also used my magic trick: “If this is too big for one file, just give me the whole extension.ts in multiple files, which should work of course.”
Claude then went on a long journey.
After some struggling to keep it going my tokens were all used and I had to figure out the remaining code myself. Nonetheless, I managed to get a running version since not much was missing and immediately realised some improvements that went unnoticed until now. Since I had to wait for my tokens to refill, I did exactly this.
The next morning the improvement session began, and after two long conversations, the context window was completely full and I could not even send messages in the same chat any more, although my tokens were not expired yet. However, all I wanted to achieve and get out of Claude was now available and I could run some tests in one of my bigger projects. After confirming and adjusting some code manually, I was satisfied for now and so I decided that the first public release was ready.
Some trial and error with  GitHub Actions later, I managed to set up the publisher for a VS Code extension. And two patch versions later, I was quite happy with the results.
Try out the extension yourself by clicking on the button below. There are still many improvements to be made, so if you are interested in helping out, feel free to contribute on 
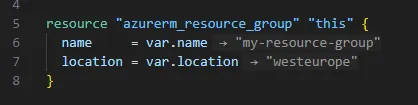
Here you can see the example from the Terraform explanation, showing how this extension visually adds the values of the variables in VS Code: