Setting up Argo CD in a k3s cluster

Having read Vegard S. Hagen’s article “Argo CD Kustomize with Helm” and decided that their solution was not the way to go for our cluster, we jumped straight into the default Argo CD “Getting started” guide. And now we will walk you through the pain of setting up  Argo CD on
  k3s and
  Cilium, continuing from the chapter “Setup Certificate Manager with Cloudflare” of our most recent post “Setting up Kubernetes with Cilium and Cloudflare”. In this exact recent post we also set up
  Keel at the end, but this step will now be unnecessary because we’ll use Argo CD for getting the newest state-of-the-art code from each
Before we can start, we need to make sure we have kubectl installed, a kubeconfig file (k3s saves this file here:
flannel-backend: "none"disable-kube-proxy: truedisable-network-policy: truecluster-init: truedisable: - servicelb - traefik) and CoreDNS (check if you have CoreDNS by running this
kubectl get pods -n kube-system -l k8s-app=kube-dnscommand).
First, let’s apply all the necessary services, deployments and many other different kubernetes resources by running:
kubectl create namespace argocdkubectl apply -n argocd -f https://raw.githubusercontent.com/argoproj/argo-cd/stable/manifests/install.yamlAdditionally, we’ll need a certificate:
apiVersion: cert-manager.io/v1kind: Certificatemetadata: name: argocd namespace: argocdspec: secretName: argocd issuerRef: name: acme-issuer kind: ClusterIssuer dnsNames: - "argo-cd.trueberryless.org"Apply this resource by running kubectl apply -f certificate.yaml.
And we’ll need a ingress controller which is managed by Cilium:
apiVersion: networking.k8s.io/v1kind: Ingressmetadata: name: argocd-ingress namespace: argocdspec: rules: - host: argo-cd.trueberryless.org http: paths: - path: / pathType: Prefix backend: service: name: argocd-server port: number: 80
tls: - hosts: - argo-cd.trueberryless.org secretName: argocdApply this resource by running kubectl apply -f argocd-ingress.yaml.
With the certificate the connection between the client and server is secured. However, there is still a self-signed certificate within the Argo CD services, which we don’t necessarily need. We can therefore deactivate the security of the Argo CD server, by editing the property server.insecure.
In order to do that, we first run this command:
kubectl edit cm argocd-cmd-params-cm -n argocdwhich will hopefully open a file in vim or neovim (otherwise would be cringe if you ask us, LMAO). The file should like something like this:
# Please edit the object below. Lines beginning with a '#' will be ignored,# and an empty file will abort the edit. If an error occurs while saving this file will be# reopened with the relevant failures.#apiVersion: v1data: server.insecure: "true"kind: ConfigMapmetadata: annotations: kubectl.kubernetes.io/last-applied-configuration: | {"apiVersion":"v1","kind":"ConfigMap","metadata":{"annotations":{},"labels":{"app.kubernetes.io/name":"argocd-cmd-params-cm","app.kubernetes.io/part-of":"argocd"},"name":"arg creationTimestamp: "2024-07-27T11:15:28Z" labels: app.kubernetes.io/name: argocd-cmd-params-cm app.kubernetes.io/part-of: argocd name: argocd-cmd-params-cm namespace: argocd resourceVersion: "239710156" uid: 5f53d26b-3adf-4ed9-9807-c3da847335a2data: server.insecure: "true"The last two lines will probably be not there at first, but this is exactly the setting we want to achieve. Go ahead and add those two lines (marked above) and save the file (Esc → :wq if you’re cool).
Restart the Argo CD Server by running and waiting till the rollout is completed:
kubectl rollout restart deploy argocd-server -n argocdkubectl rollout status deploy argocd-server -n argocdAfter all those steps, we should now see the UI under https://argo-cd.trueberryless.org (password protected).
Now in order to create a new application in Argo CD (either UI or CLI — we use UI cause we didn’t setup CLI), we need to prepare the Git repository. Because the repository is the single source of truth, this is also the place, where we define all the kubernetes resources which should be created by Argo CD.
We recommend creating a new folder in the git repository called something like manifest. In this folder, we’ll create a few files:
-
certificate.yaml:apiVersion: cert-manager.io/v1kind: Certificatemetadata:name: mutanuqnamespace: mutanuqspec:secretName: mutanuqissuerRef:name: acme-issuerkind: ClusterIssuerdnsNames:- "mutanuq.trueberryless.org" -
deployment.yaml:apiVersion: apps/v1kind: Deploymentmetadata:name: mutanuqnamespace: mutanuqlabels:app: mutanuqspec:replicas: 3selector:matchLabels:app: mutanuqtemplate:metadata:labels:app: mutanuqspec:containers:- name: mutanuqimage: "trueberryless/mutanuq"imagePullPolicy: Always -
service.yaml:apiVersion: v1kind: Servicemetadata:name: mutanuqnamespace: mutanuqannotations:cert-manager.io/issuer: acme-issuerspec:selector:app: mutanuqports:- name: httpport: 80 -
ingress.yaml:apiVersion: networking.k8s.io/v1kind: Ingressmetadata:name: mutanuqnamespace: mutanuqspec:rules:- host: mutanuq.trueberryless.orghttp:paths:- path: /pathType: Prefixbackend:service:name: mutanuqport:number: 80tls:- hosts:- mutanuq.trueberryless.orgsecretName: mutanuq
These files are basically the exact same files mentioned in the other post but separated into four files because this gives us the advantage to manipulate the manifest from
You’ll probably see the big NEW APP button in the UI of Argo CD. Click it and create a new application with adapted properties from below:
- Application Name:
mutanuq - Project Name:
default - Sync Policy: Find out more in this post / leave
Manualfor now - Repository URL:
https://github.com/trueberryless-org/mutanuq - Revision:
HEAD - Path:
manifest - Cluster URL:
https://kubernetes.default.svc - Namespace:
mutanuq
Optionally — if you have the CLI installed — you can run this command for the same output:
argocd app create mutanuq \ --project default \ --repo https://github.com/trueberryless-org/mutanuq \ --revision HEAD \ --path manifest \ --dest-server https://kubernetes.default.svc \ --dest-namespace mutanuqNow you can hopefully see your website being deployed in the UI. This process can take some time because for example the certificate request needs to be approved. A healthy application should look something like this:
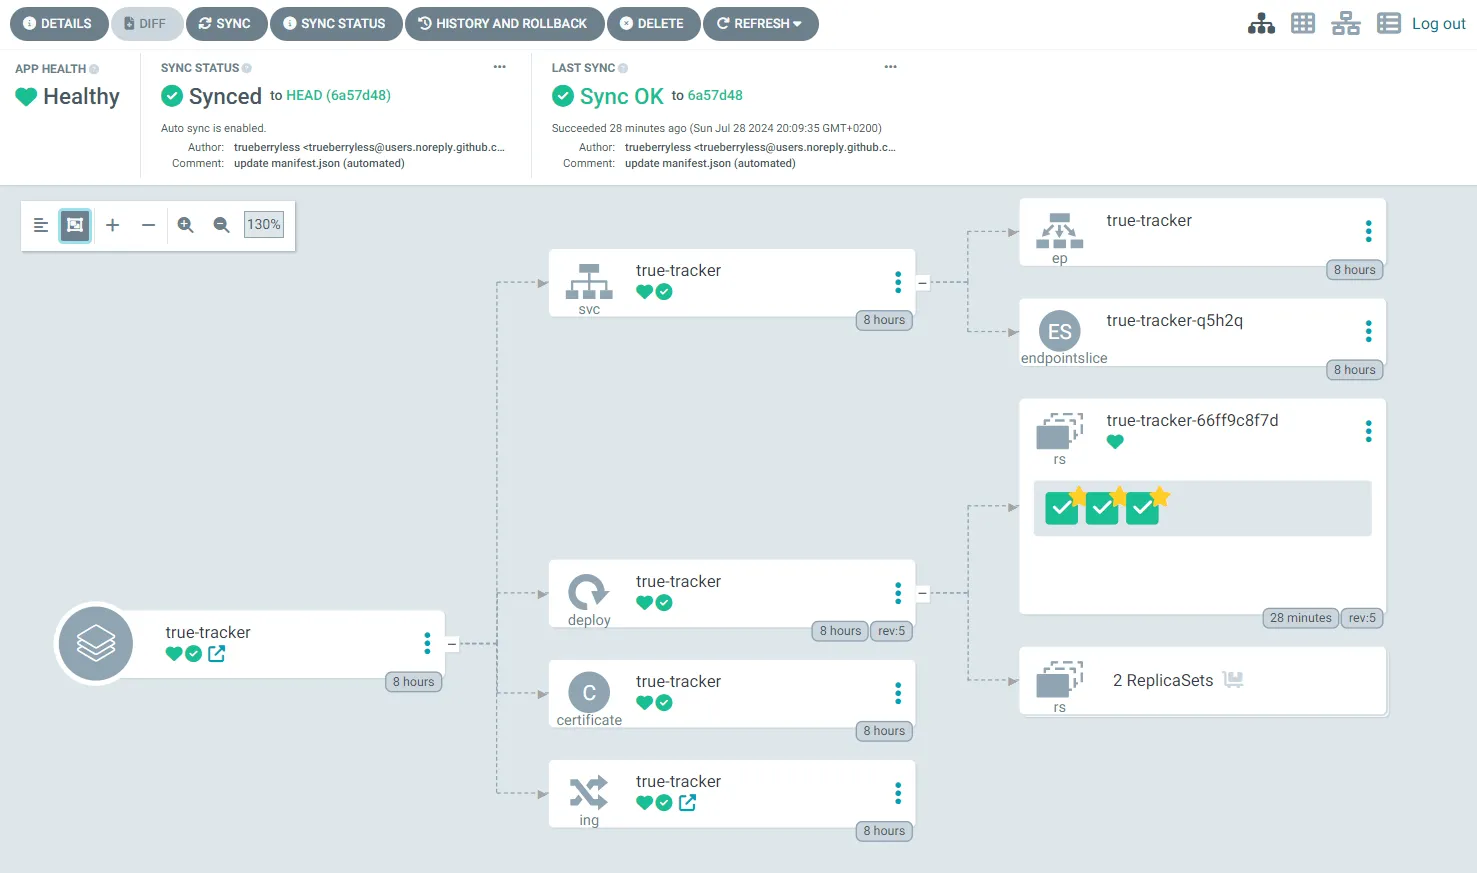
Congratulations, you’ve successfully set up Argo CD on a k3s cluster! You deserve a coffee break. Enjoy a well-earned cup, and if you’d like to share a virtual coffee with me, feel free to support my work on Ko-fi. Thank you!
Be continued for our next blog which will describe how to set up a